

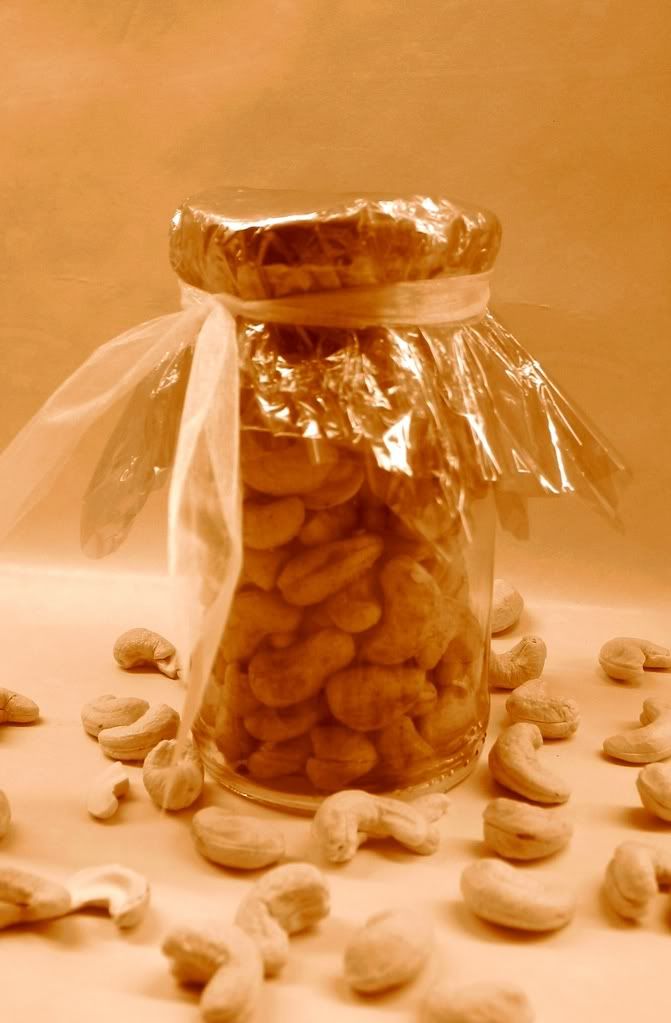
Spicy Pan Fried Cashewnuts( Masala Jeedipappu/Chatpata Kaju )
45 COMMENTS Posted by KALVA at 3:55:00 PMNothing is more comforting than a bowl of hot toasted spicy cashews( cashew nuts ). This a very special savoury snack back home which is a classic recipe passed down from generations! Gifting with a small pack of these cashew nuts makes someone feel so special and important. My mom showers her love towards my dad just by making these and serving them hot! All i can say she is an expert doing this. Cashewnut is the king of all nuts( at least for me ) since this is dear hubby's favorite. These spicy cashews are perfect kodak moment for CLICK . Hence this will be my entry for the beautiful CLICK : NUTS event hosted by Jai and Bee of Jugalbandi.
The nuts are so crunchy with the special zing from red chili powder and amchur powder, Frying them in ghee( neyyi aka clarified butter ) makes them so rich in taste( who wouldn't love butter ) . This is a perfect SNACK anytime of the day with a cup of hot tea! Once tasted your guests will leave asking for more and Yes they go real fast!!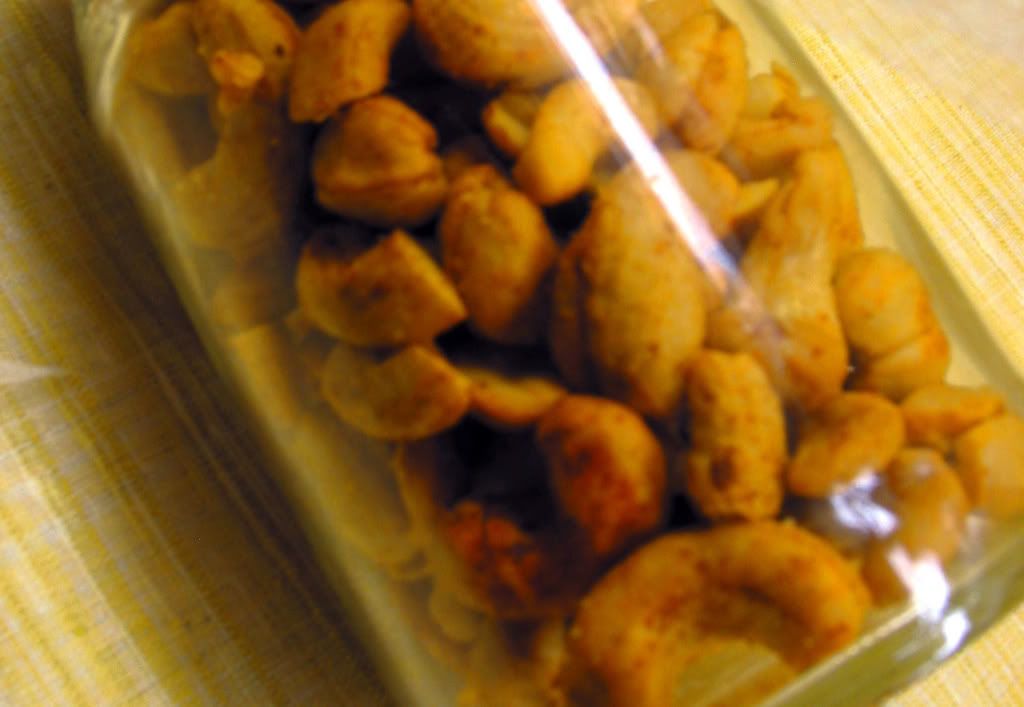
You need:
- 1/2 pound whole cashew nuts -- I prefer to use whole cashew nuts ( jeedi pappu bollalu )
- 1/2 tsp red chili powder
- 1/2 tsp black pepper powder
- 1/2 tsp dried mango powder( amchur powder )
- 2-3 tbsp butter or ghee( clarified butter )
How to make spicy cashew nuts:
- Heat butter/ghee in kadai or pan and fry the cashew nuts under low flame
- As the cashew nuts turn into golden hue, drain them on to paper napkins and sprinkle salt, chili powder, black pepper powder and mango powder immediately
- You can adjust salt and spice to taste.
- Once cooled store in an airtight container. This stays fresh at least up to 10 days.
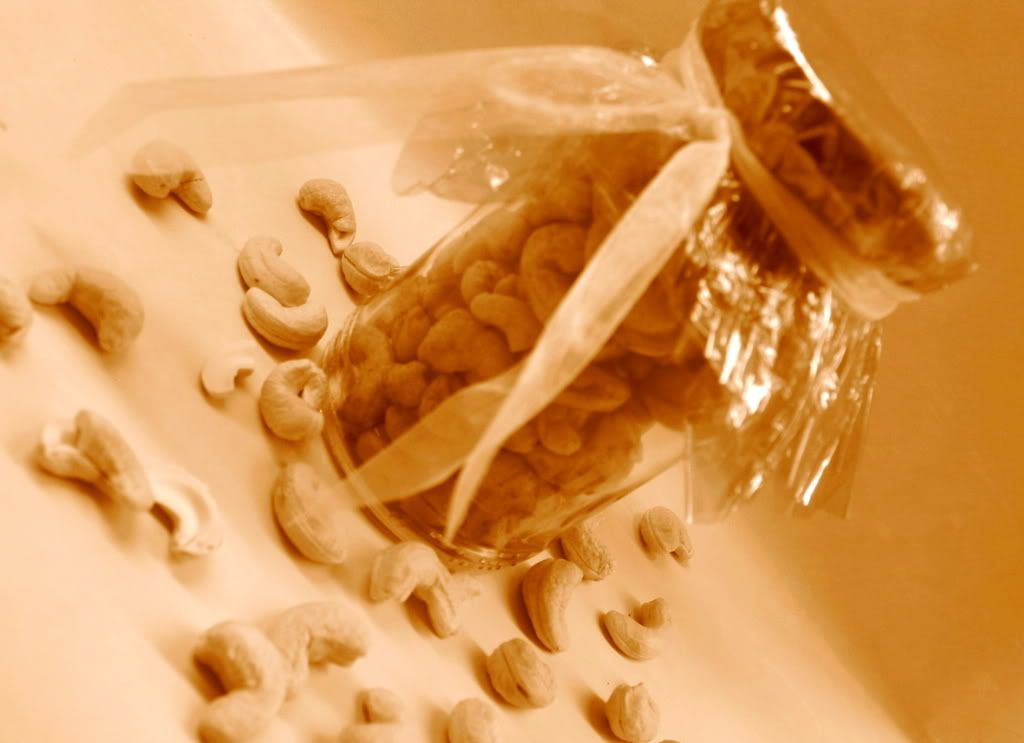
Wrap up these spicy, nutty and crunchy cashew nuts in a glass jar and voila simple yet delicious gift is ready! This spicy pan fried cashew nuts recipe is on its way to Spoonful Of Christmas, hosted by Zlamushka!
Gongura Pachadi / Sorrel Leaves Chutney / Pulicha keerai Chutney / Chukka Bhaji
24 COMMENTS Posted by KALVA at 4:10:00 AMGongura aka Sorrel is called Andhra Maatha( Mother of Andhra Pradesh, India ). Serving gongura pickle(chutney) for any guest is like giving honor to him. Yes its that important. Gongura is full or iron and tastes very sour just like tamarind. Normally tamarind is a must in most of the indian / andhra pickles or chutneys, but this one with sorrel leaves is an exception. I find myself very lucky that day, if i find this one in indian grocery.
I am proud owner of this plant. Yes, I have gongura(sorrel) plant in my backyard now, and i made this chutney using the same. Theres a funny history behind planting this plant. Actually my husband doesnt eat any chutneys or pickles, the only green leafy indian vegetables he eat are Amaranth leaves and spinach. Since it was so hard for us to get amaranth leaves here, i bought some seeds saying ( paala thotakura ) Amaranth Leaves seeds and planted them.Once the tender leaves started to sprout i was surprised to find them to be Sorrel plant instead of Amaranth as it says on the packet. And now i am reaping the fruits of this plant. It was so funny, I shared this story whenever someone intrigues about the plant in my backyard.. The sorrel leaves have special distinct sourness which leaves you craving for more once tasted. It actually revives your taste buds, if u havent had anything lately that has special zing!
To make Gongura Pachadi, you need:
- 4 cups of tightly packed cleaned and washed sorrel leaves( just pluck the leaves, discard the stems )
- 1 large onion
- 5-6 green chillies
- 2 red chillies
- 2 tbsp coriander seeds
- 2 tbsp urad dal / black gram beans
- 2 tbsp channa dal / yellow split chickpeas
- 1 tsp cumin seeds( jeera )
- a dash of hing / asofetida
- 10 curry leaves
- 1 tbsp oil
- salt to taste
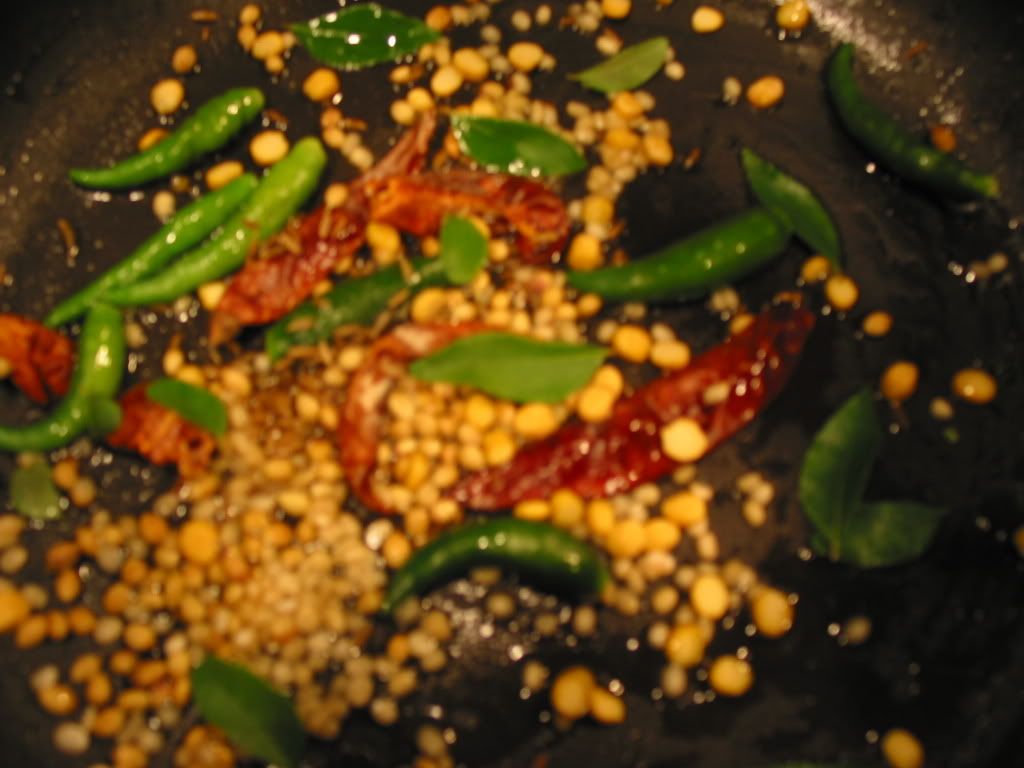


Toast the seasonings:
- Heat kadai or pan and 1 tsp oil and roast urad dal, coriander seeds, red chillies, cumin seeds, hing.
- Dont brown them, fry them until the starts to release flavors and the lentils turn to golden hue.
- Once cooled down powder them and set aside.

How to make chutney:
- Pluck the leaves from the stems, wash clean and drain them and remove excess moisture using a kitchen towel.
- In the same kadai add remaining oil and sorrel leaves and green chillies
- Cook these leaves under low heat until the raw smell disappears( check the picture )
- Once the leaves are cooked thoroughly , the leaves color changes from green to nearly black switch off the flame and let it cool
- In a blender run the spices first and once powdered finely, add the greens and blend to a paste
- Chop the onions and add to the ground chutney
- Your sour leaves aka gongura chutney is ready to relish!

Serve this sour chutney with hot rice( with clarified butter on top ), chapathi, rotis or bread. Another classic serving suggestion of this chutney is with plain home made yogurt and rice. The tangyness from the chutney compliments the curd/yogurt very well. This chutney stays good in the refrigerator for upto a week, make sure you dont add extra water. This will be my entry for Grow Your Own hosted by Andrea.
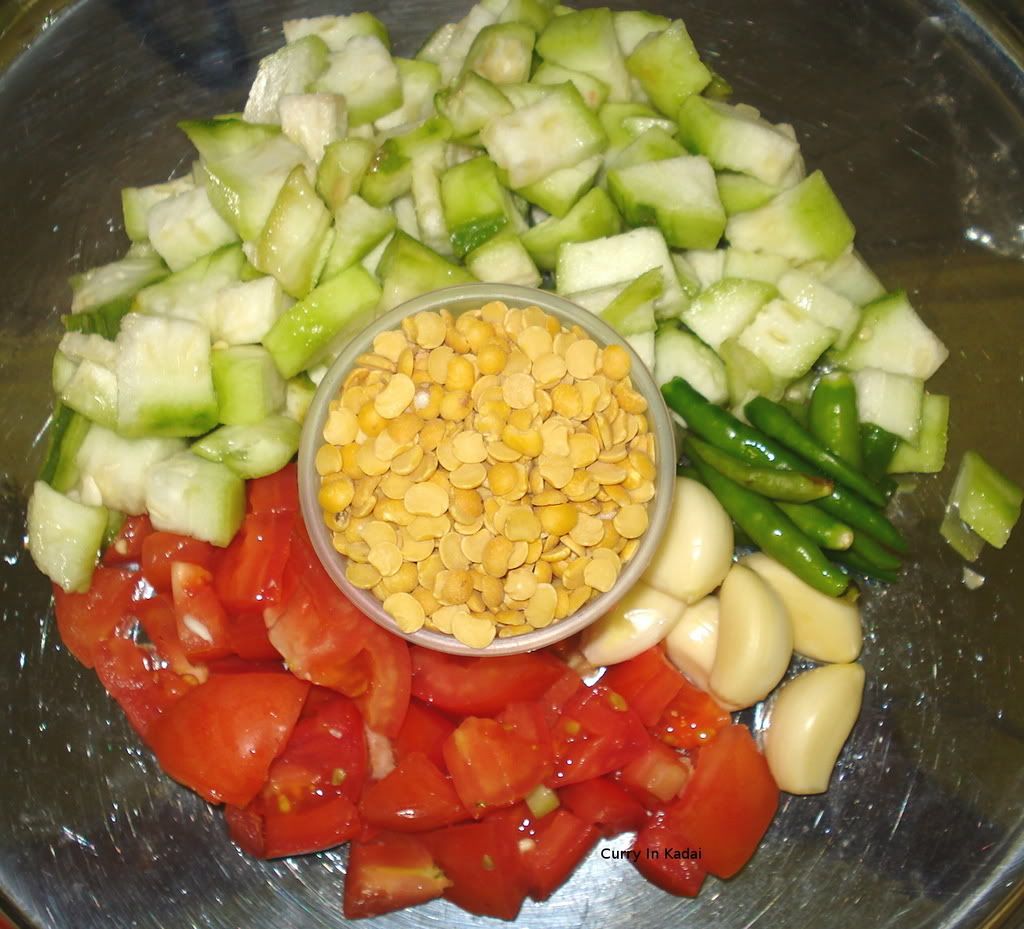
Beerakaya Pulusu Kura( Ridgegourd in spicy tamarind Sauce )
24 COMMENTS Posted by KALVA at 11:31:00 PMHere is my another favorite recipe for Ridgegourd aka Beerakai. When i was a kid, i wasn't a big fan of this vegetable but after coming here i started craving for this veggie a lot. This recipe calls for tender ridge gourd and tamarind. Ridge gourd is extremely versatile like Tofu since it can absorb the flavors of other ingredients that it comes in contact. Make sure you look for tender ones when buying!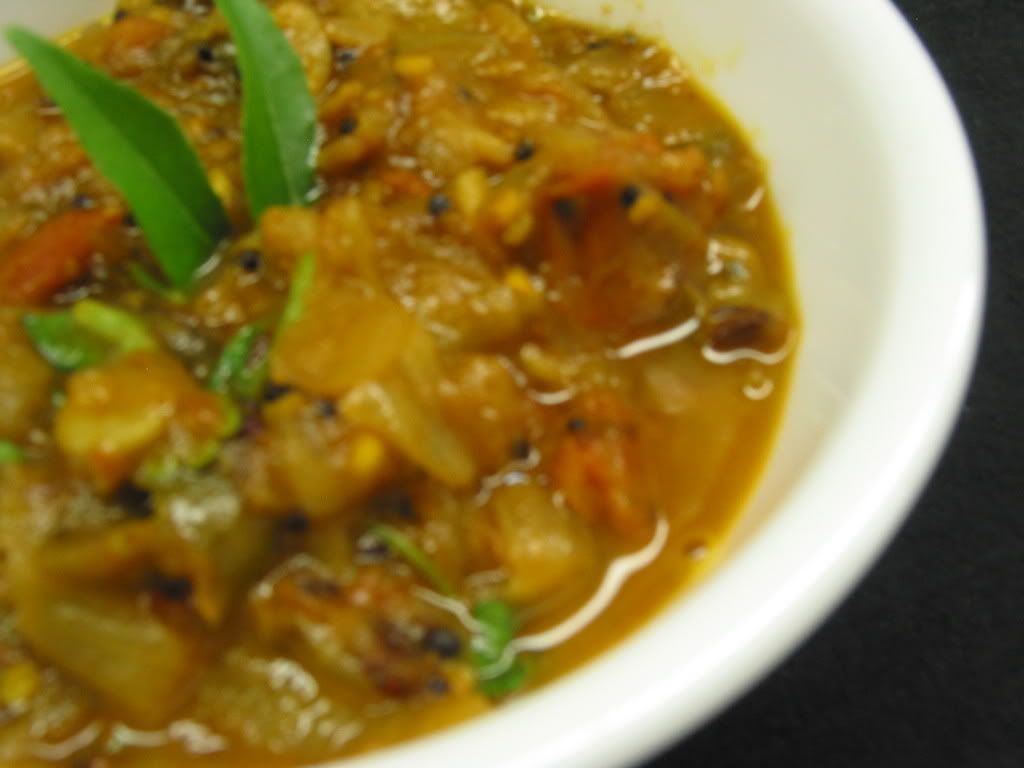 How to know if ridge gourd is tender( letha beerakayalu ):
- Look for sharp ridges and when pressed your nail should be able to easily slip into the gourd which says they are tender and ready to be cooked, unlike the mature ones which are used to make Loofahs.

Normally they use milk ( palu posina beerakai kura ) when they cook with ridge gourd, but in this recipe i am using tamarind. This Beerakaya pulusu curry is a one pot dish which is so simple yet quickly adds up to good health and great taste. The unique texture of ridge gourd when cooked and the zing from the tamarind makes this curry a hit. Another important addition to this curry is Fenugreek Seeds aka Methi Seeds which adds so much flavor to the curry( Dont cook this curry if you dont have fenugreek seeds on hand!! )
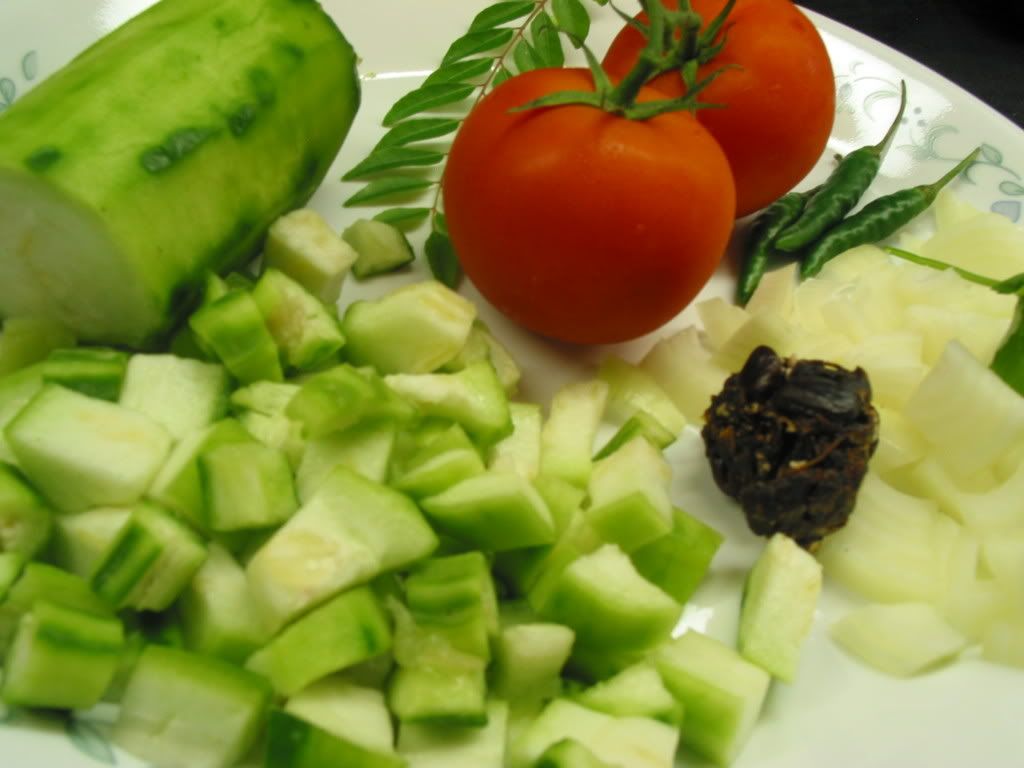
Ingredients:
- 1 arm sized ridge gourd( beerakai )
- 1/2 small lime sized tamarind
- 1 big onion
- 5 green chillies
- cilantro / coriander
- 1 tsp sugar
- 1 tsp mustard seeds( aavaalu )
- 1 tsp cumin seeds( jeela karra/ jeera )
- 1 tsp Methi seeds( menthulu )--- Required!
- 10 curry leaves
- a dash of hing
- 1 tbsp split chick peas / chana dal
- 2-3 tbsp oil
- a pinch of turmeric
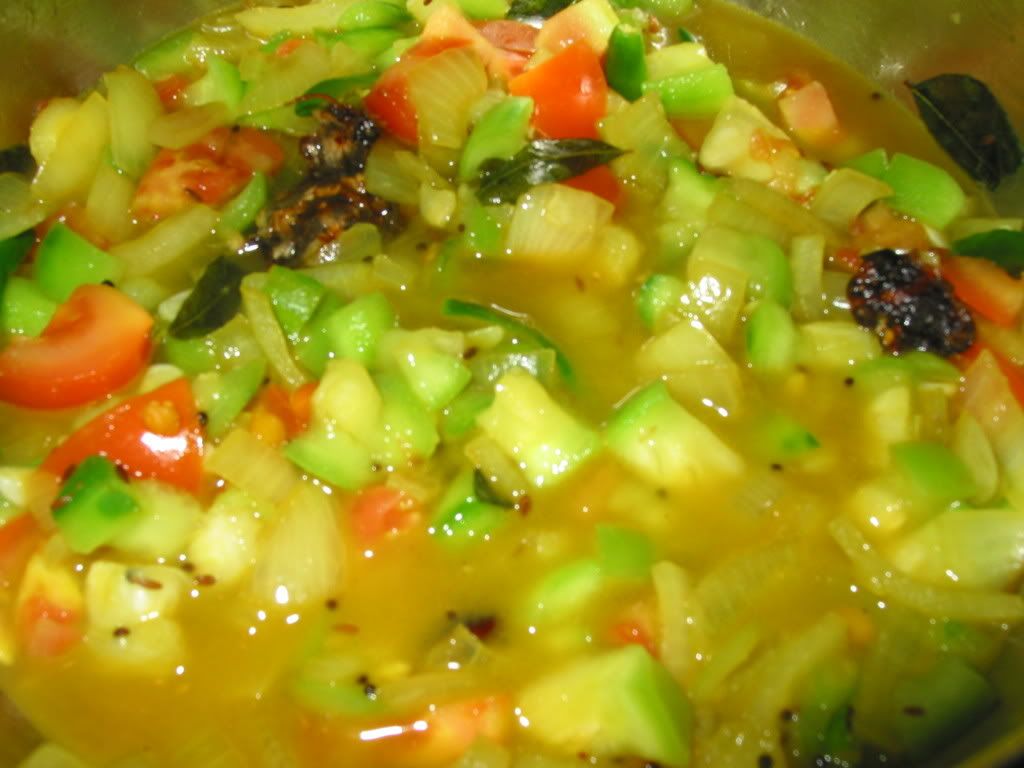
Method of preparation:
- Peel the gourd ( save the peels for the chutney ) and chop into 1/2 inch pieces
- Slit green chillies length wise, and onions into 1 inch pieces
- Soak tamarind in warm water for 5 min, remove any seeds in tamarind and keep aside
- In a pressure pan, heat oil and add seasonings and when they start to pop, add curry leaves, onions and chillies
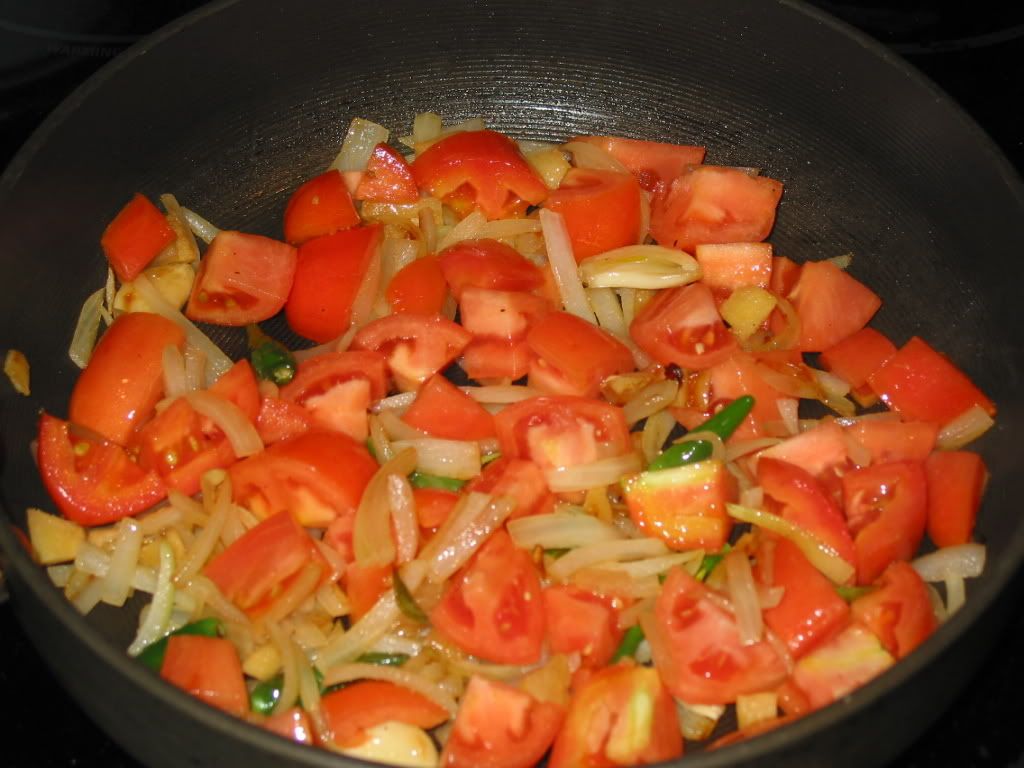
- Fry for 30 sec and add ridge gourd pieces( beerakai mukkalu) and tomatoes
- Saute for 2 more min and add tamarind pulp and water until the pieces just get immersed in water
- Pressure cook for 5-10 min or if u have Indian style pressure cooker with weight, switch off the heat just after one whistle
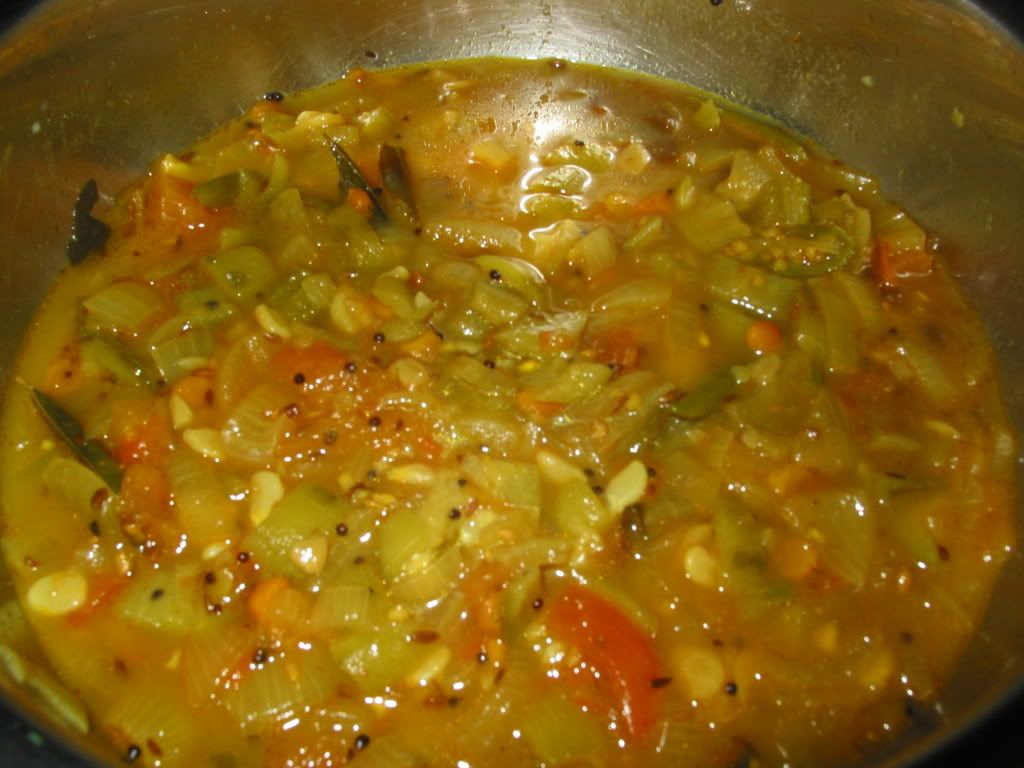
- Once the weight comes off easily, open and cook under flame until desired thickness.
- You can mash it a little(or more if you want a thick gravy ) with a round bottommed spoon or masher.
- Add sugar at this point( you can either avoid or get overboard with sugar )
- Adjust salt to taste and if you need more spice, you can add red chilli powder.
- Switch off the flame and add cilantro! Voila, the spicy ridge gourd curry is ready!
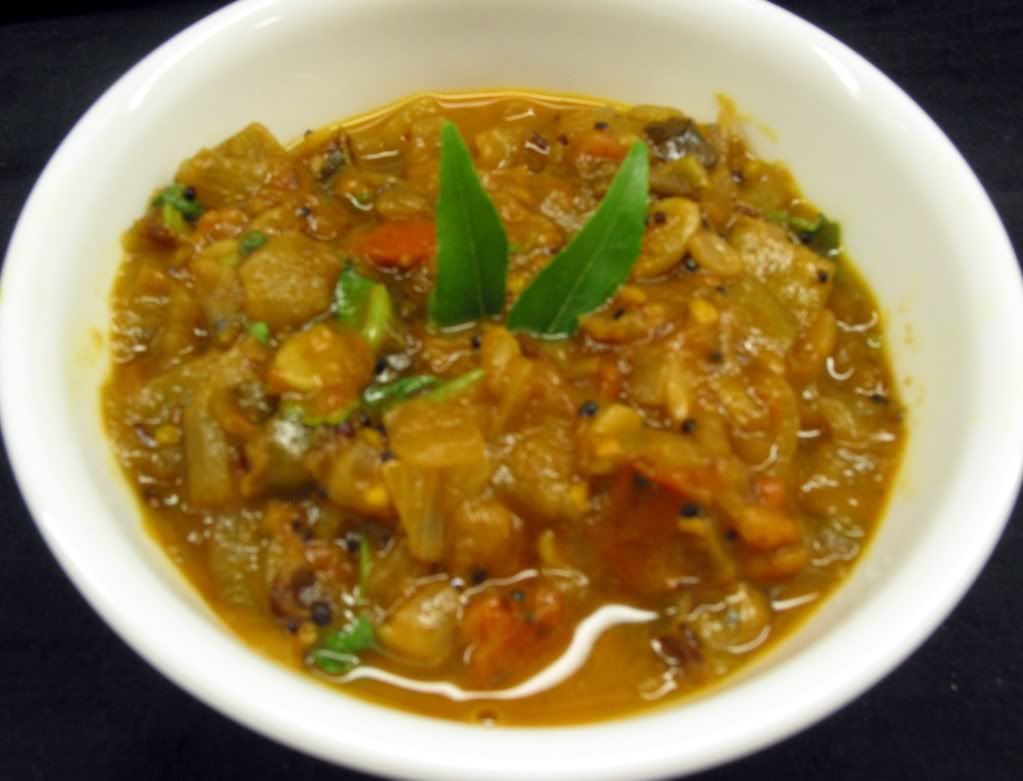
Ridge gourd curry in tamarind sauce tastes great with hot rice, roti, chapathi or bread. You can follow the step by step how to pictures for this curry! This will be my entry for Vegan Month hosted by Suganya . And this grindless gravy is on its way to Grindless Gravies event hosted by SRA
The other day in the grocery i saw this beautiful petite Squash( it looked like dosakaya to me ) and fallen love with it. Never bought the spaghetti squash but i knew we can make delicious side dish with it in microwave itself. These are very cheap during this time and are in abundance. You can steam spaghetti squash in the microwave for a no-fuss side dish. Here is my recipe for spaghetti squash in Indian Style. This dish is on its way to WHB hosted by What's on My Plate
How to cook squash:
Pierce the spaghetti squash with fork , you should extend all the way to the center( like steam vents )
Cook it for 10 -15 mins in the microwave.
If the steam doesnt start to comeout from the squash cook for 5 -10 more min until the steam vents out.
Let it cool for 10 min
Cut the squash length wise and remove the seeds( dark yellow strands ).
Use fork and run through the length and you will see spaghetti strands ( see picture )
How to prepare Side Dish:
In a big microwave safe bowl( corelle or pyrex ) add 2 tbsp oil, mustard seeds, cumin seeds, urad dal and heat for 2 min until the dal turn golden brown
Add chopped green chillies and onions and cook for 1 more min
Add chopped red bell peppers and ciook for 30 sec
Chop the tomatoes , add to the bowl and cook for 1 more min
Now add salt and the stranded squash, mix everything and cook for 2 min covered
Adjust salt to taste and garnish with coriander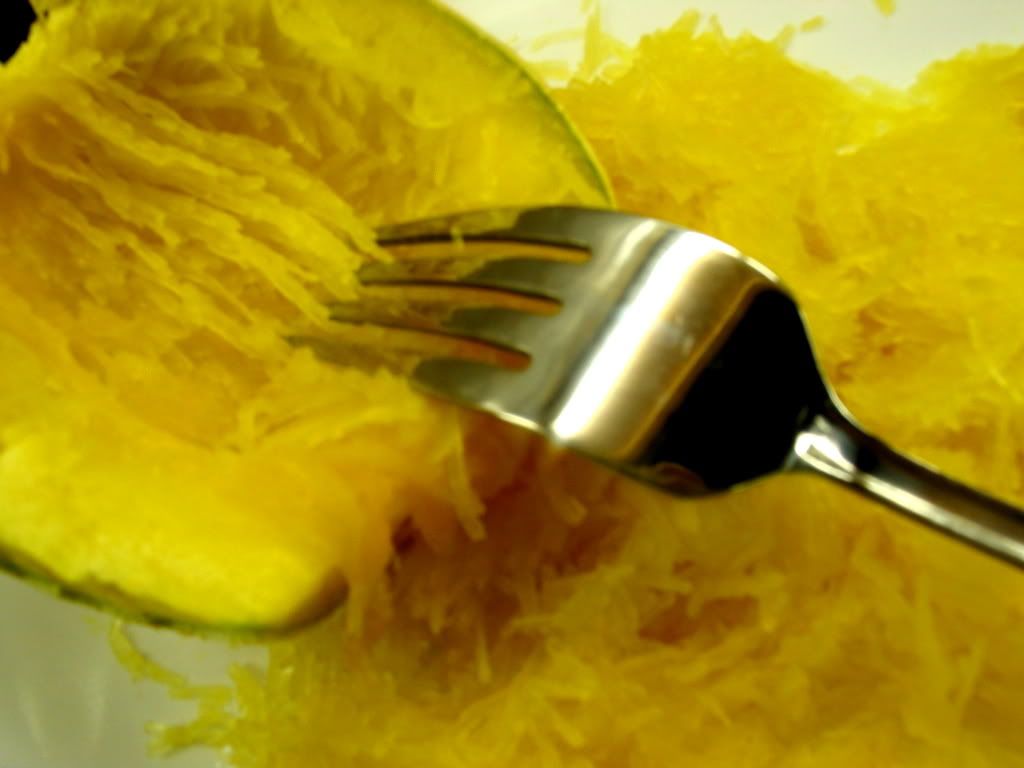
You can serve this as an elegant and delicious side dish! You can even add peas, grated cheese, or simply olive oil, garlic and black pepper. But i found this Spaghetti Squash with Indian twist very interesting! This dish can pack quite a flavor and nutrition punch! This dish is going to HEART OF THE MATTER _ Quick and Easy.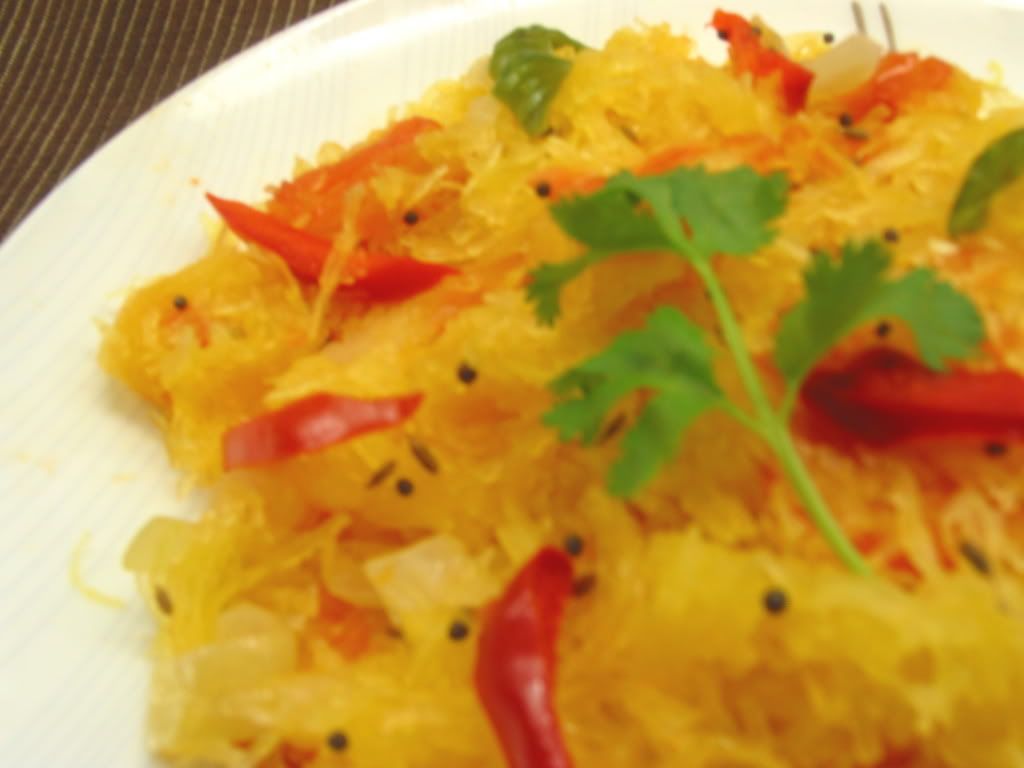
Normally in Indian cuisine we use cubed squash in curries or grated squash for dessert. Cooking squash this way is very easy and moreover this is one pot dish. Hence, this will be my entry for Microwave Cooking: Side dish.
Tags: Spaghetti Squash, Squash Curry, 100% Microwave Curry.
Tomato Allam Nuvvula Pachadi / Tomato Thokku( Tomato chutney with ginger and sesame seeds )
24 COMMENTS Posted by Kalva at 11:30:00 PMGinger has an earthy taste that raises the flavor quotient of many(Indian) dishes. Ginger had been proved to be effective in reducing cold, flu and headaches. It is compared to work as effective as aspirin in thinning the blood. Dried ginger with salt( we used to call Bhavana Allam) aids in digestion too. Ginger is being used for ages for its medicinal values.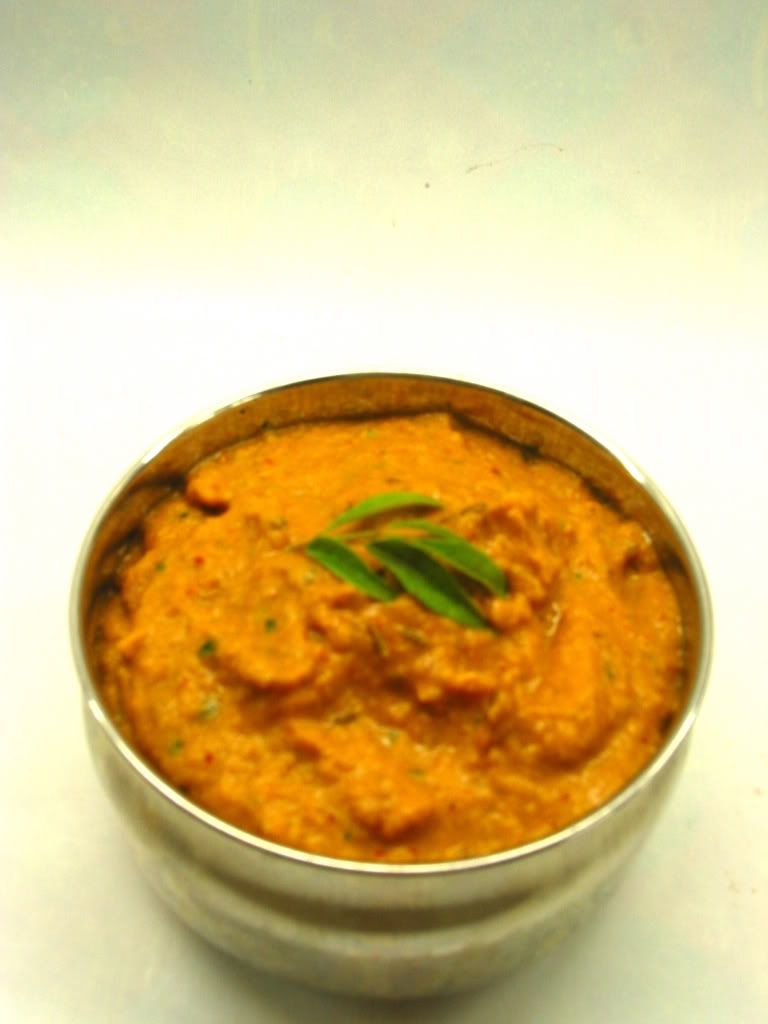
Coming to the Tomato Allam(Ginger) Nuvvula(Sesame seeds ) chutney, its my husbands one and only favorite chutney he likes to eat with rice. It has been passed down to me from my MIL. Adding sesame seeds and ginger to this chutney add an unique flavor to the basic tomato chutney. For this chutney you need to make sesame seeds spice powder first!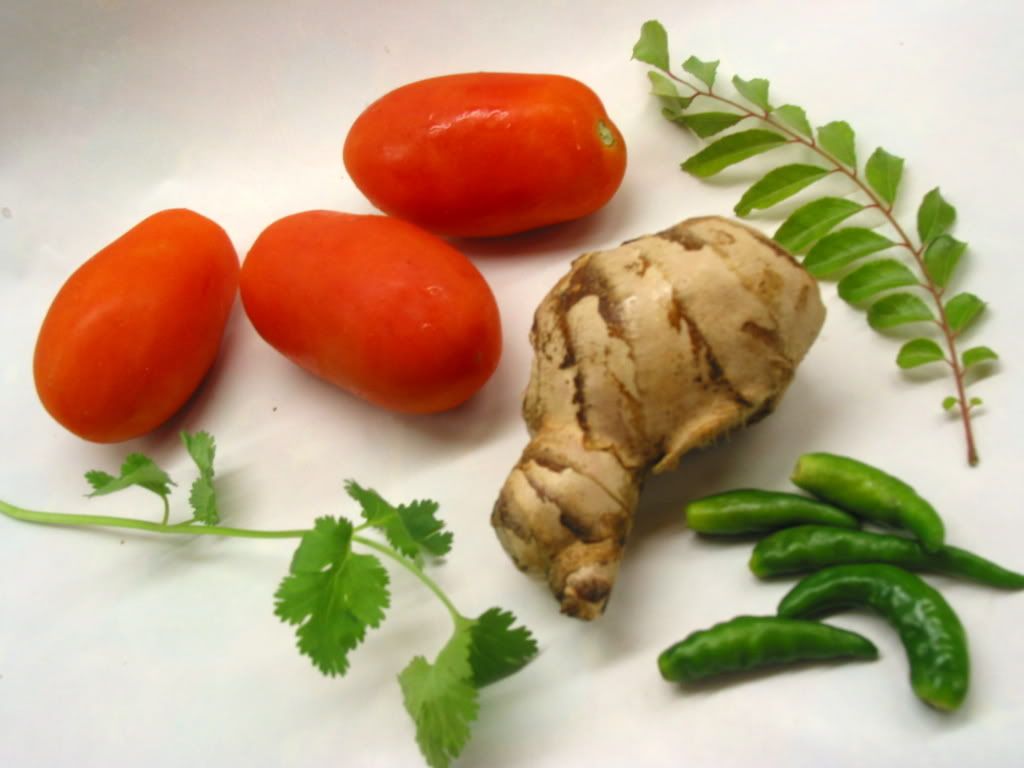
To prepare Sesame Seeds Spice Powder( Nuvvula Daniyala Karam ), you need:
1 cup sesame seeds
1/4 cup coriander seeds
1 tbsp cumin seeds
6-8 red chillies
In a pan or kadai take a dab of oil and saute sesame seeds, coriander seeds and red chillies. Remove from pan and cool once the sesame seeds turn to golden hue. In a spice jar or blender powder the toasted seeds and store it in an airtight container. You can use this spice powder in tomato chutney, spinach chutney and ridgegourd chutney.
To prepare Tomato Ginger Chutney, you need
6 ripened tomatoes
1 inch ginger root
2-3 cloves garlic
1/2 small onion
2-3 green chillies( optional for even spicier chutney )
3 stalks of coriander aka cilantro
10 curry leaves
3 tbsp oil
2-3 tbsp of the above prepared sesame powder
Method of preparation:
Peel ginger and chop onions and tomatoes
In a kadai or frying pan, heat oil and add curry leaves, onions, ginger, garlic and tomatoes
Fry until the tomatoes are cooked and soft
Once cooled, in a blender grind the sauteed tomato paste along with the sesame powder and cilantro
Normally you dont need water to blend, you can add a little if you want though
Adjust salt and spice powder to taste
Serve this tomato chutney with ginger and sesame seeds along with hot ghee rice , dosa, idli, chapathi or roti. This stays good in the refrigerator for upto 3 days. This is my entry for Think Spice: Ginger event!
Until yesterday nothing clicked to me for the CLICK:NOODLES event hosted by Jai and Bee. I walked to the pantry looking for something else and found Noodles and Jello sitting next to each other, thats when my Noodle Jigglers were born!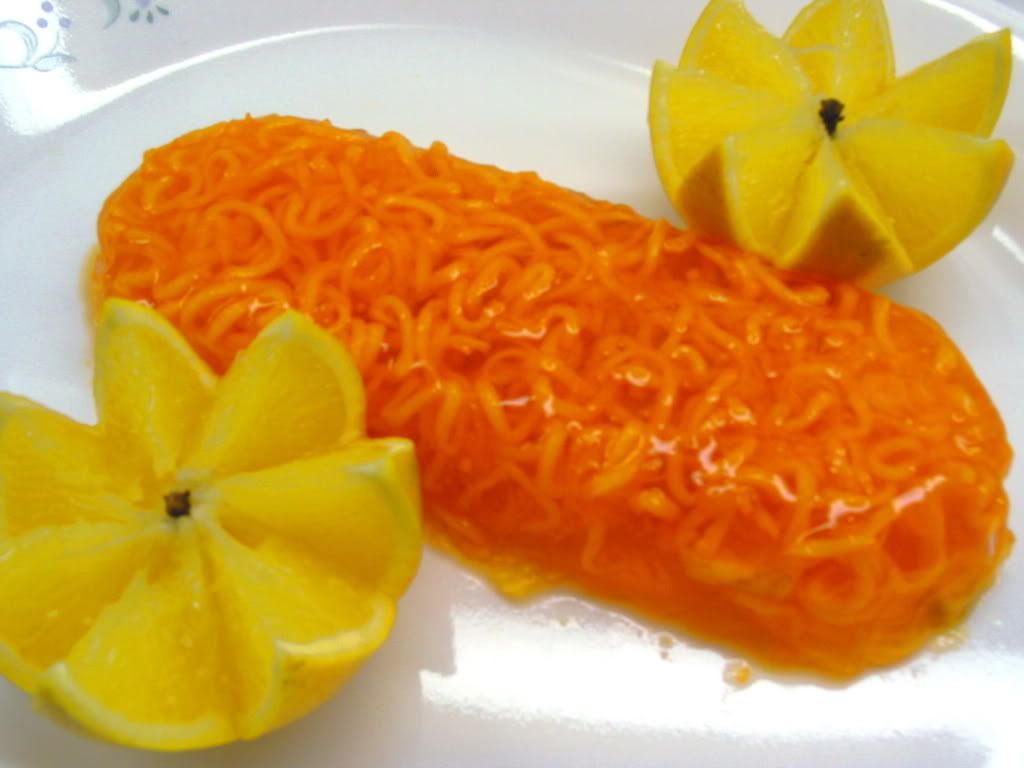
This is a very simple yet lip smacking fun dessert both kids and adults can enjoy together. Most of us have our own favorite ways of having noodles, but i am sure this can easily fit into your list. I used regular plain noodles and for the gelatin, chose orange flavor for its unique color and tartness. I even added some chopped Pear( bought fresh the day before ) and everything turned out to be a guilt free healthy dessert!
You need:
Small Jello packet -- i used orange flavor
Half packet Ramen noodles
Any fruit - here i used fresh pears chopped to 1/2 inch bites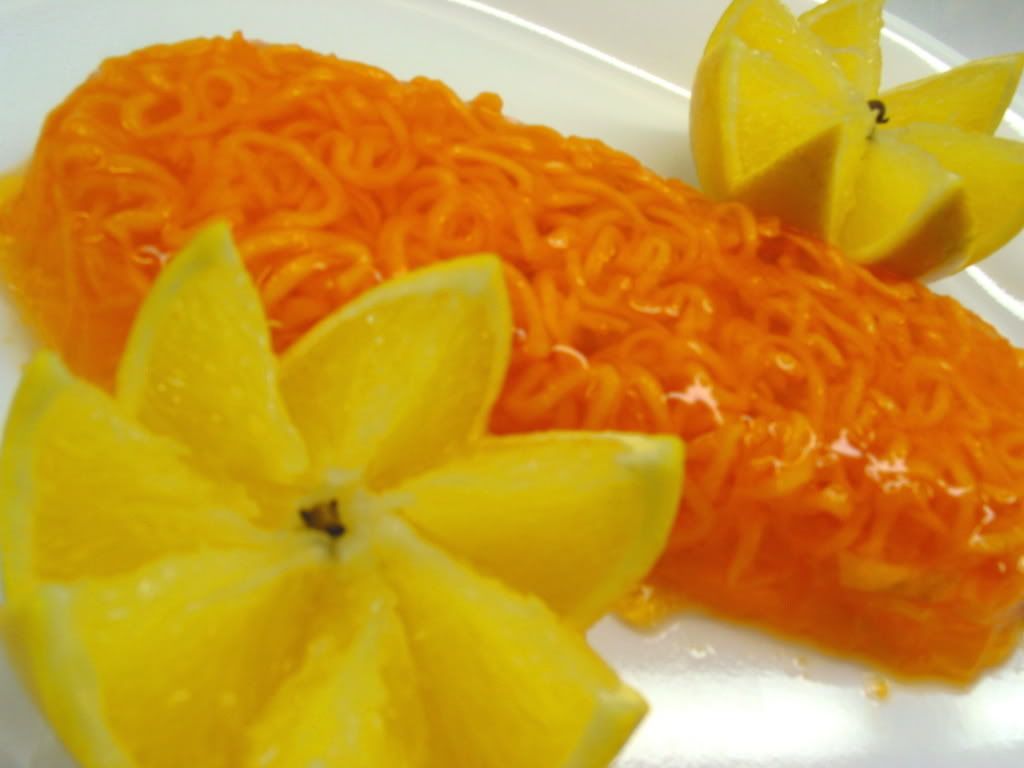
Preparation:
Boil noodles, once cooked run under cold water and keep aside
Cook gelatin according to the package instructions
Pour gelatin into desired moulds, add chopped fruit and noodles
Let it set in the refrigerator for 4 hrs
Tada! your Noodle Jigglers are ready to relish!
Serving suggestion:
Add any fruit on hand, anything should work!
To finish the platter i used an orange cut into some budding flowers( its not that great and i wasnt sure since it was my first time ) and some pomegranate seeds for color!
For an elegant dessert, use individual moulds topped with some whipped cream!
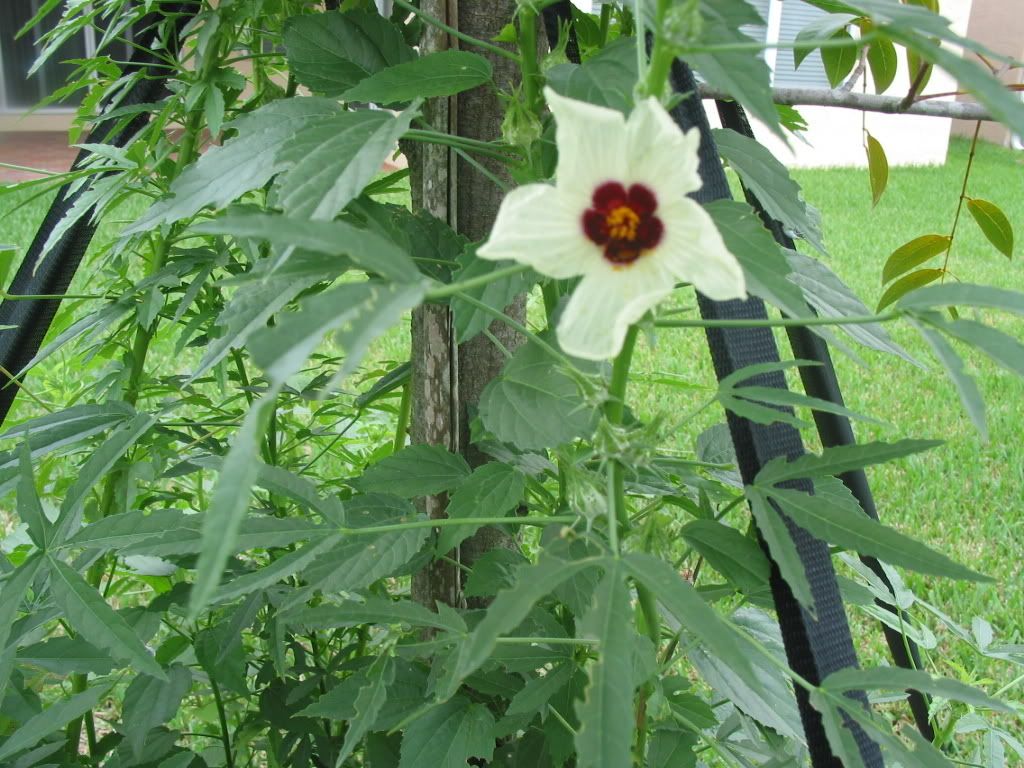
Ridge Gourd called Beerakaya in telugu and Turia in hindi and Peerkangai in tamil is a popular veggie in India. It is basically from the Cucurbit family ( gourds family ) like chayote, cucumber, squash etc.,. It looks rugged and strong from outside, but the inside is spongy and neither too moist like cucumber nor too dry like squash. This veggie tastes very mild, sweet and never boring. you can saute with garlic and onion or cook with tomatoes for a robust side dish. Recharge your favorite dal or vegetable curry by swapping out any squash for ridge gourd. Ridge gourd is a virtual factory of Dietary Fiber, Vitamin C, Riboflavin, Zinc, Thiamin, Iron, Magnesium and Manganese. This veggie is also low in saturated fat and cholestrol.
To tell the truth when i was a kid i never liked this vegetable and used to make faces when my mom tried to give us this because of its goodness . Also she used to say that it cools the body heat( vedi thaggisthundi ) in many folds. I remember she used to save all those peels and make chutney the same day. Yes the peel is full of fiber and the chutney tasted great( no complaints for the chutney though!). I started to love this vegetable only after coming to US( since indian grocery was too far then i hardly had chance to cook them ) .I usually make beerakai thellagadda neyyi talimpu( ridge gourd sauteed with ghee and garlic ), beerakai pappu( ridge gourd with lentils ), beerakai pulusu koora( ridgegourd in tamarind sauce ), beerakaya pachadi( ridge gourd chutney ), beerakai pottu kura( ridge gourd peel curry ), beerakaya pottu pachadi( ridge gourd peel chutney ). My sister is the best cook i know of after my mom and this recipe is actually from her! She cooks in authentic andhra style and that too she does everything in a gif! Kudos to my sweet sister!
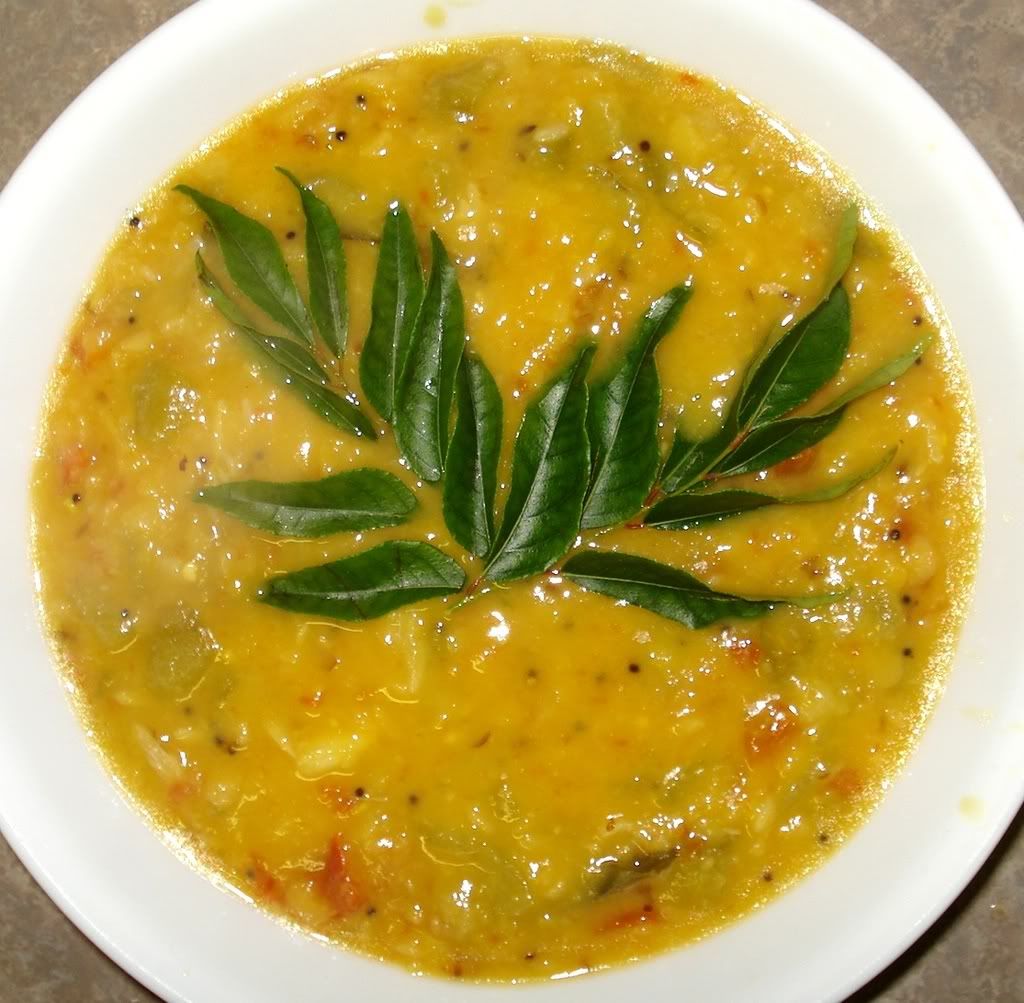
The following recipe calls for Toor dal ( lentils ) spiced with green chillies and tamarind for the sourness. This dish is so simple yet quickly adds up to good health and great taste. Look for sharp ridges and when pressed your nail should be able to easily slip into the gourd which says they are tender and ready to be cooked, unlike the mature ones which are used to make Loofahs.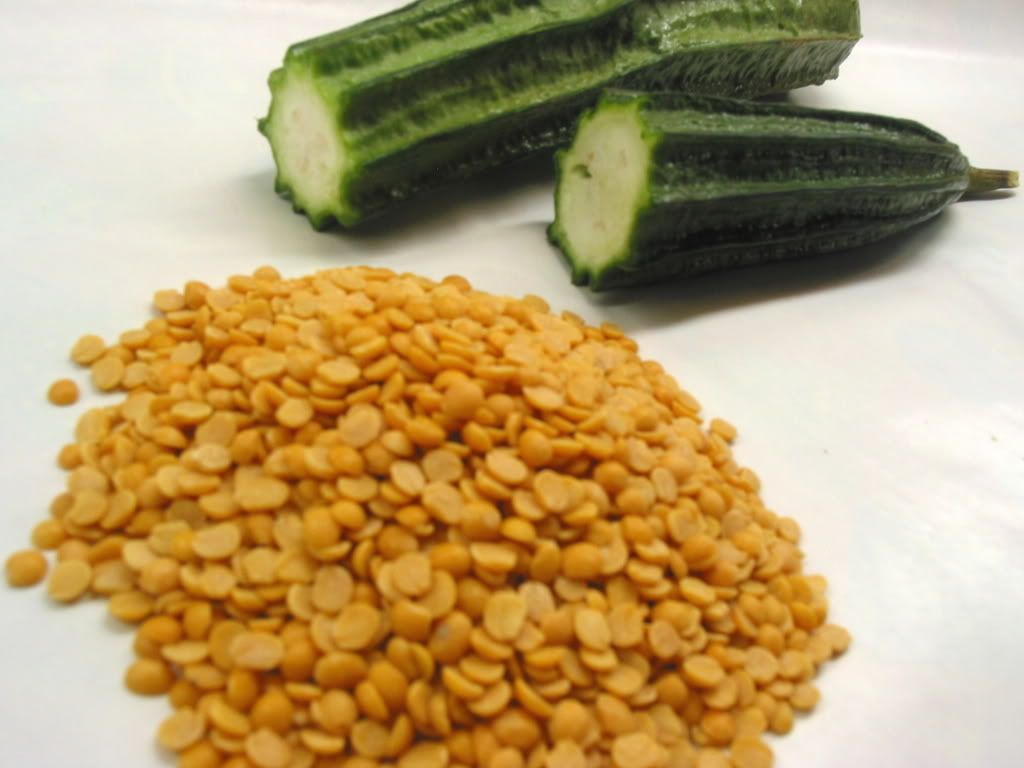
Coming to the recipe, you need:
1 arm sized ridge gourd peeled and chopped into 1 inch squares
1 big onion chopped 1 inch pieces
8-10 green chillies cut length wise
4-5 garlic pods( crushed )
1 cup Red gram( toor dal/ tuwar dal/ kandi pappu)
2 tomatoes
lemon sized tamarind
2 cups water
For tempuring or tadka
1 tsp cumin seeds
1 tsp mustard seeds
dash of hing
a pinch of turmeric
10 curry leaves
2 tbsp oil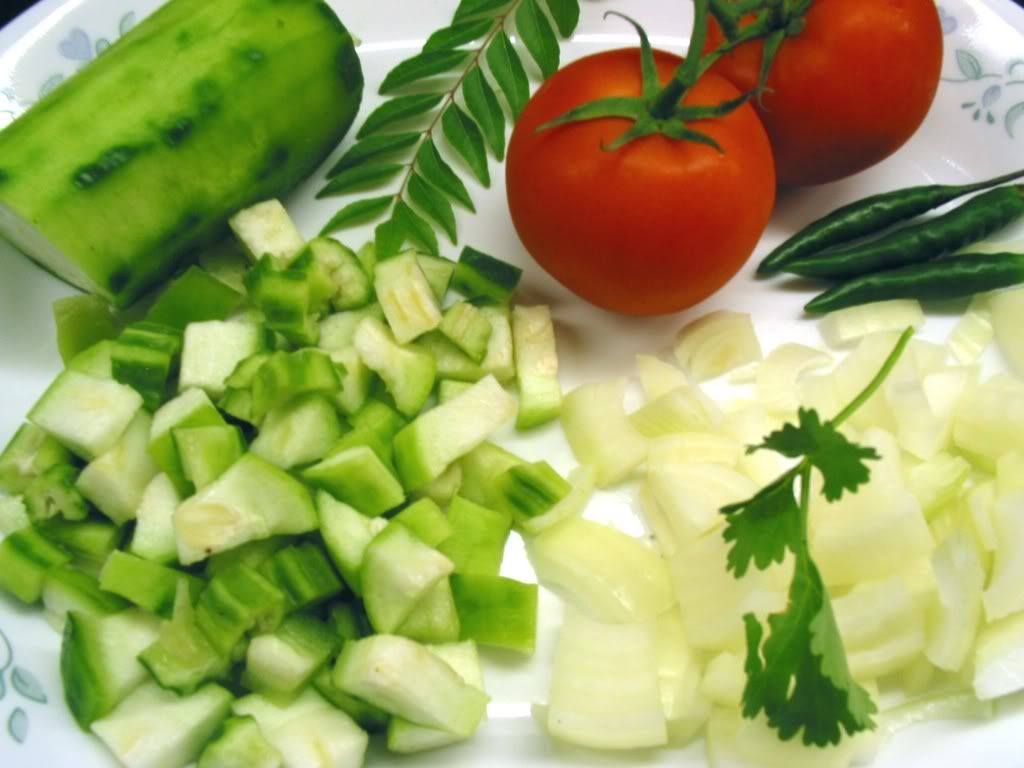
Preparation:
Peel the ridge gourd( save the peels for the chutney ) and chop into pieces
In a dry pan add some ghee/ butter and fry the washed and dried toor dal. Frying the dal gives unique texture, flavor and sweet aroma to the dish.
In a pressure pan, add oil, and do popu or tadka
Once the seeds start to dance around, add curry leaves, hing and turmeric
Add the garlic, onions, green chillies and saute for a min.Now add tomato and ridge gourd pieces( beerakaya mukkalu ) and saute for a min.
Add the cleaned and soaked toor dal, soaked tamarind, water and pressure cook for 2-3 whistles( takes anytime between 5-10 min ). Or you can cook seperately until the toor dal falls apart.
Remove the weight and cook for 5 more min. Add coriander just before serving
Adjust salt to taste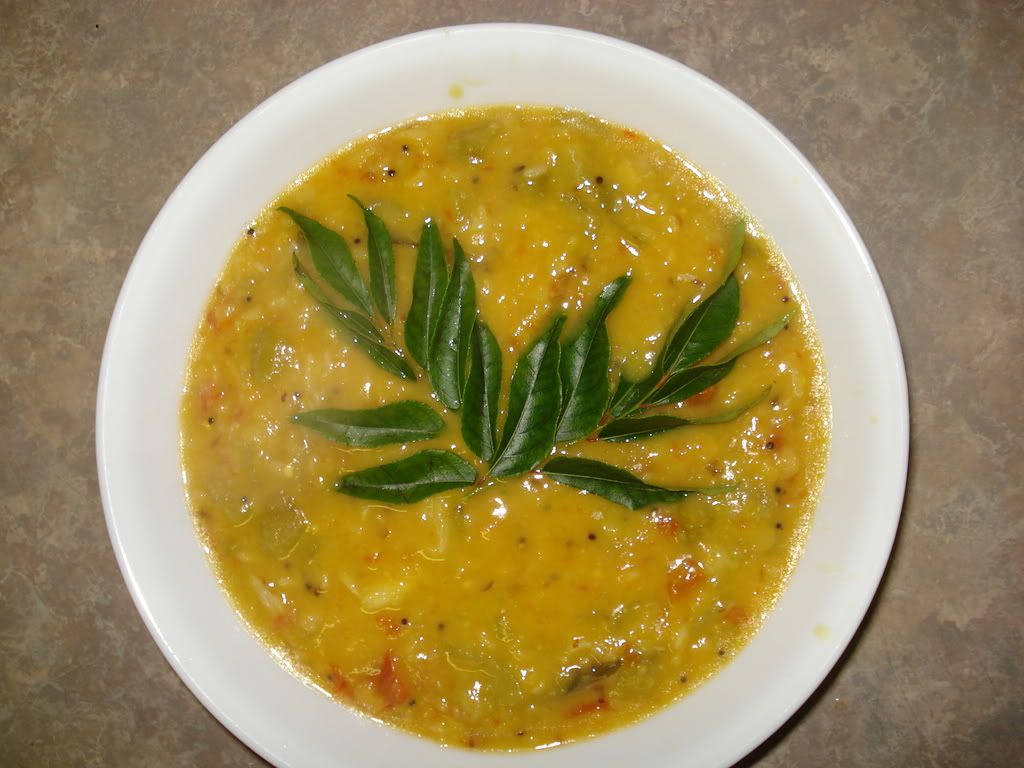
Serve this beerakaya pappu aka ridge gourd and lentils curry with steamed rice, chapathis, rotis or whole wheat bread. Nothing is more comforting than a bowl of rice and this dal! This post is on its way to JFI - Toor Dal hosted by Linda.
Tags: Beerakaya pappu, Peerkangai Pappu, Ridge Gourd and Toor Dal, Ridge gourd curry with lentils, Turia Dal
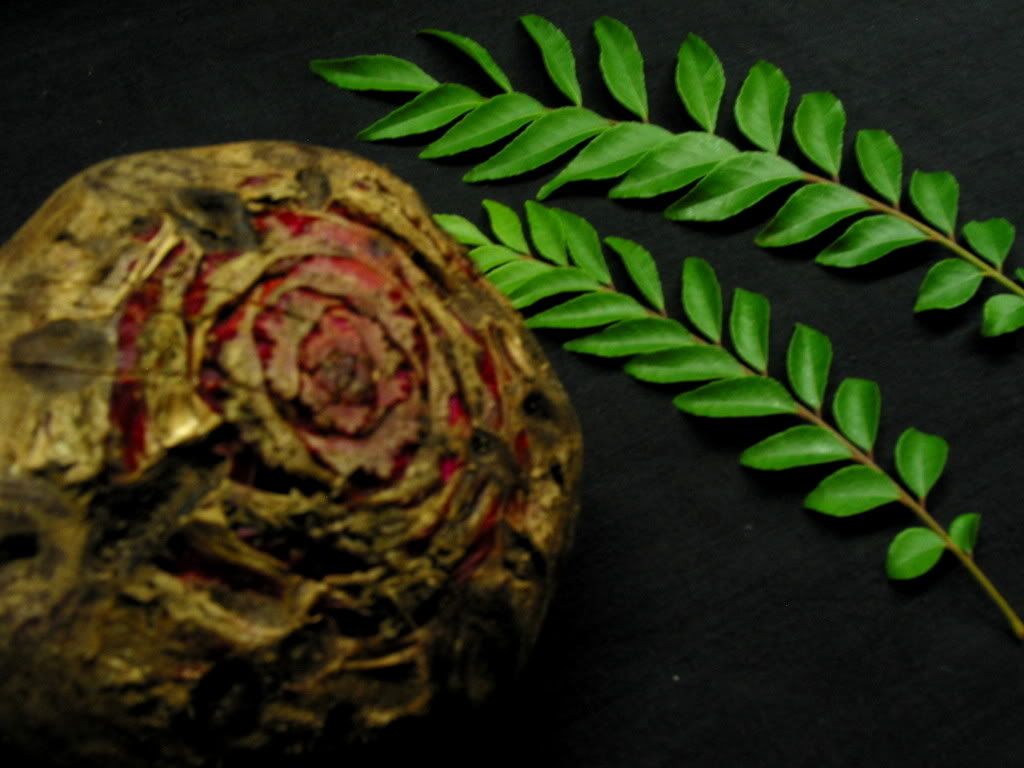
Beets aka Beetroot is the most nutritious of all root vegetables. I dont know if mom used to say 'Beetroot adds new blood to your body' just to make us eat! But the following is true though, beetroot is good for the health of the heart as it contains soluble fiber with can help to reduce high blood cholesterol levels. It also contains the phytochemicals, carotenoids and flavonoids which help prevent LDL ‘ bad’ cholesterol from being oxidised and deposited in the arteries. Cooked beetroot is a great source of folate that can protect you against high blood pressure, Alzheimer’s and dementia. For more information click here.
 Dont miss curry leaves! It adds so much flavor
- 1 large beets or 2 small beetroots
- 1/2 cup green peas
- 1/4 cup grated coconut or 3-4 2- inch squares
- 5-8 green chillies
- 1-2 tbsp oil
- a big pinch of turmeric
- cilantro for garnish( optional )
- Salt to taste
 Chop up big beetroot into 4 pieces and smaller one into 2
For seasoning:
- 1 tbsp chana dal( bengal gram dal )
- 1 tbsp urad dal( black gram dal )
- 1 tsp jeera( cumin seeds )
- 1 tsp( mustard seeds )
- 10 Curry leaves
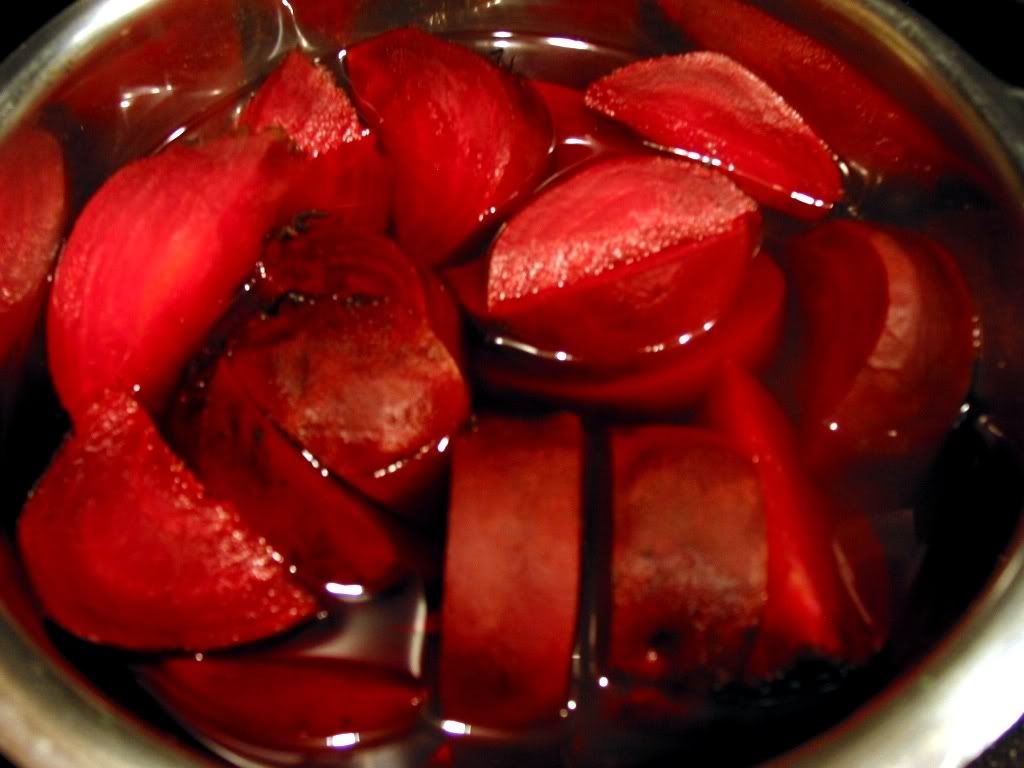
How to cook the beets:
- I know how hard it is to peel and cut the raw beets. Not anymore if you follow my steps below.
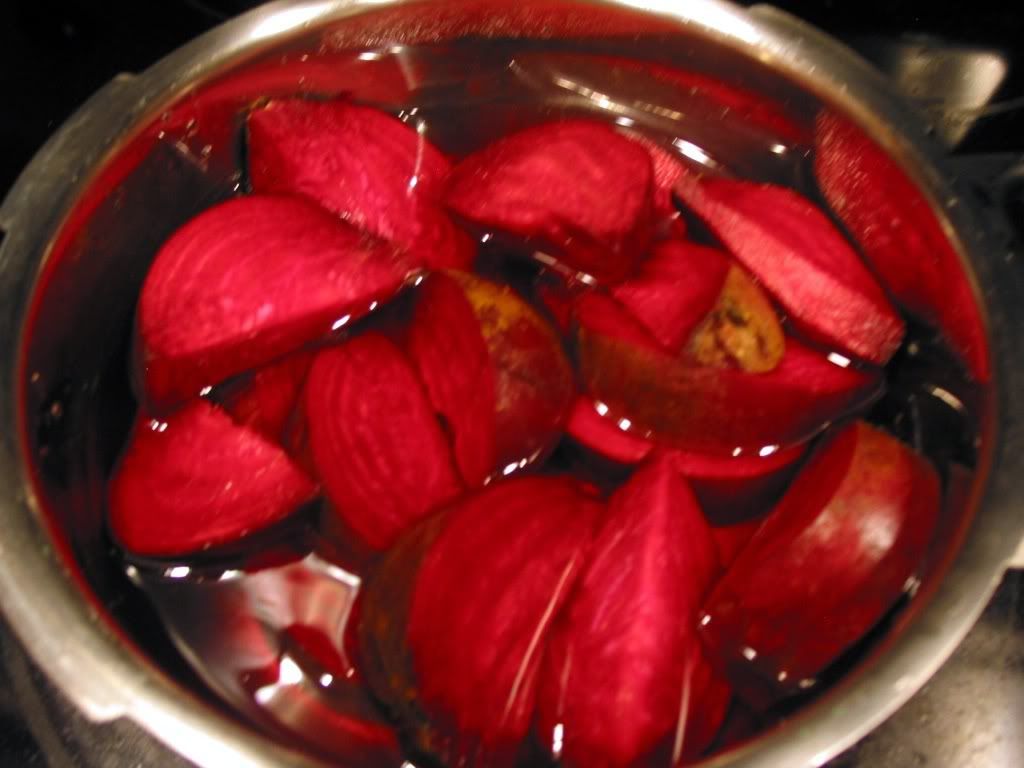
- Clean the beets thoroughly and make small beets into 2 halves( 4 for a bigger one ) with the peel on.
- In a pressure pan or cooker cook the beets with water for 3 whistles.
- Once the weight comes out without any pressure drain the beets
- Let them cool a bit. Now the peel comes off right away with the finger pressure( couldnt be any easier than this )
- Chop them into 1 inch squares
 Pressure cooked beets to perfection
- Chop the boiled beets into 1/2 inch squares
- Heat oil in kadai or pan and add the seasoning - mustard seeds, cumin seeds, urad dal, chana dal and curry leaves
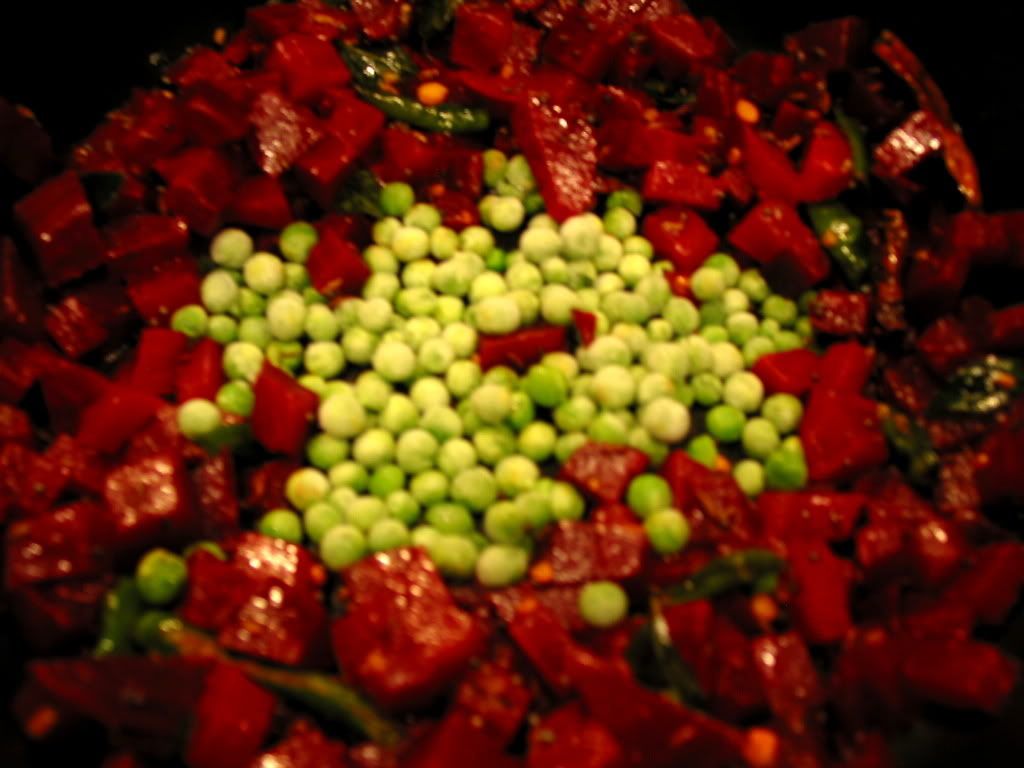
- When mustard seeds start to wiggle around, add the green chillies, chopped beetroot, green peas, turmeric and salt
- Saute them until the beetroot starts to lose water and peas cooked
- Add the grated coconut and fry for one more min
- Adjust salt and chillies to taste. Garnish with coriander

When draining the cooked beets save the water for beetroot rasam/soup( i will post that recipe soon). Cooking beets this way uses very less time, gas and effort. Since we are not throwing the water we are not at all losing the nutrition! And the best part cooked beets stay fresh up to 3 days in the fridge and you can saute fresh whenever you want. Freezing cooked beets is a very bad idea and don't try to attempt like me. They become soggy once thawed in the microwave and I am sure once you make this recipe you wouldn't be left with any leftovers!!

Ahh Cant BEET this!
The sweetness from the beets , crunch from the split peas( chana dal ), nutty flavor from the coconut, spiciness from green chillies and the aroma of the curry leaves makes the boring beetroots SIMPLY EXQUISITE! Nothing can BEET this recipe! Serve this beetroot curry with hot rice or chapathi. This Sweet and Spicy beets recipe is on its way to weekend herb blogging event hosted by Vanessa from What Geeks Eat.
TIP: Mix some thick whipped yogurt into the cooled beets curry., you have beets raitha in minutes!
Tags: Beetroot curry, Beetroot poriyal, Beetroot vepudu, Beets and Peas Fry, Beets fry, Beets peas and coconut curry
Deepavali Subhakankshalu! Wish you all a very happy and delightful Diwali. Diwali as the name suggests is ' array of lights ' and you see light coming from deeyas in almost every house in India. The day before Diwali is Narakachathurdasi, when the lord Krishna killed the deamon Narakasura. Diwali is also being celebrated for the return of the god Rama after 14 years of exile. It is the festival for the triumph of good over evil. The festival of lights ( diwali ) insists on shedding the darkness of the mind with the light of Gnana( Knowledge )
Diwali takes me to a walk down the cherishable memory lane. I remember this is the one such festival packed with so much excitement for the D day, where we can fire the crackers all night long, relish delicious food, take part in the lakshmi pooja and never forget new clothes and jewelery. I would do anything for those days. I was always a silent spectator when it comes to fireworks (bombs) like lakshmi tapas, vankaya bambulu, rockets, parachutes etc, I would be on the safer side with kakarathulu, chichu buddulu, venna muddalu, nela tapakayalu, paamu billalu, Bhu chakram,Vishnu chakram and my most favorite Aggipettalu. I remember my grandma asking us to lit the diya( lamp) outside the house during the whole month of diwali and recite this sloka for the sandhya deepam( evening lamp).
Deepam sarva tamopaham
Deepena saadhyate sarvam
Sandhya deepam namosthuthe
Usually this would come first in my list when we expect someone for lunch/dinner. Almost everyone who tasted this asked for the recipe and were really surprised to know how easy, delicious and light this was.


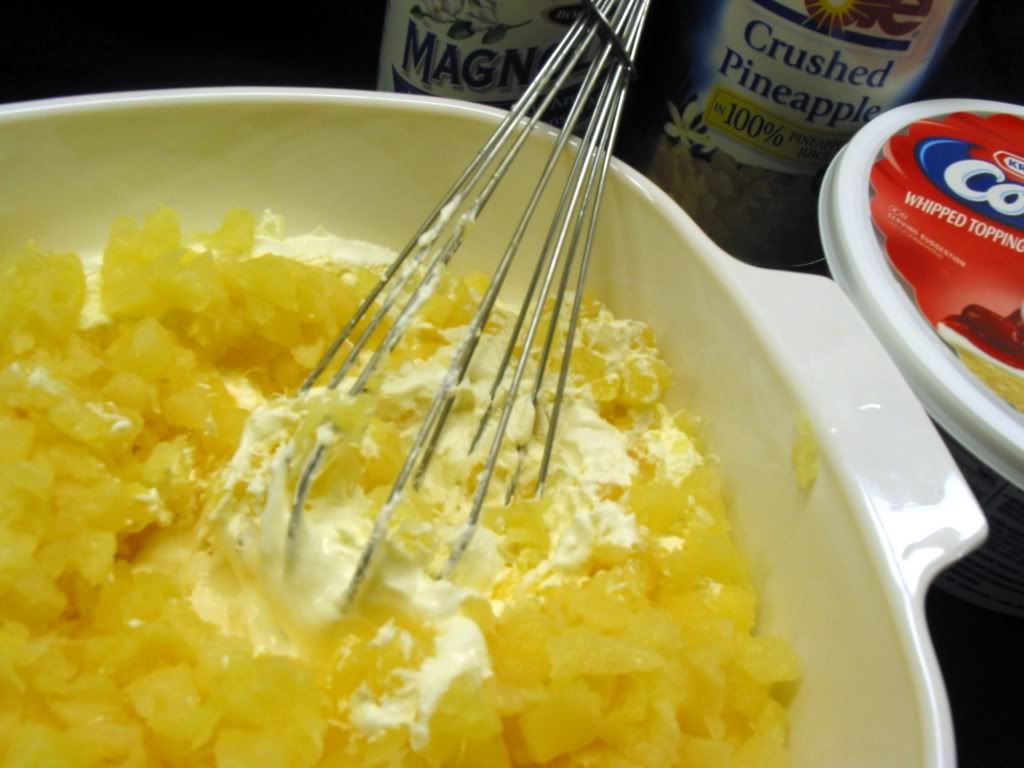
You need:
1 - 8oz cool whip or home made whipped cream
1 - 20 0z crushed pineapple can in its own juice
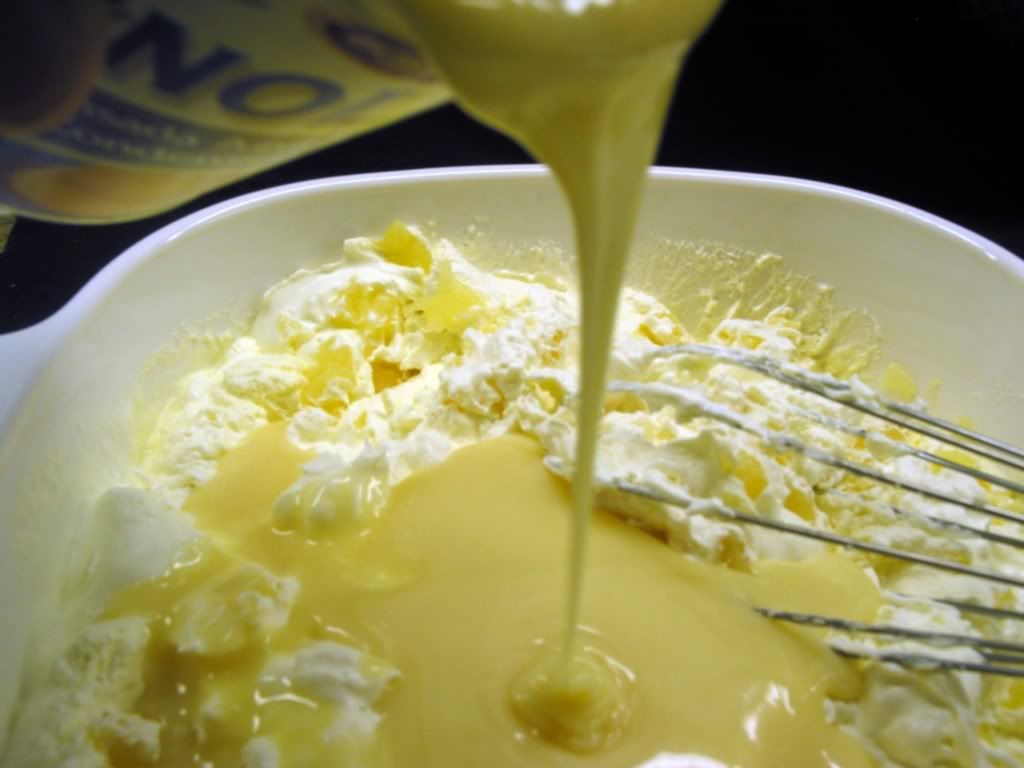
1 - 14 oz sweetened condensed milk or milkmaid
A big fistful of almonds( badam )
A big fistful of cashewnuts( kaju )
25 pistachios( pista )
Preparation:
Keep the cool whip whipped cream outside for 20 min until it becomes spreadable. For fresh cream you can avoid this step
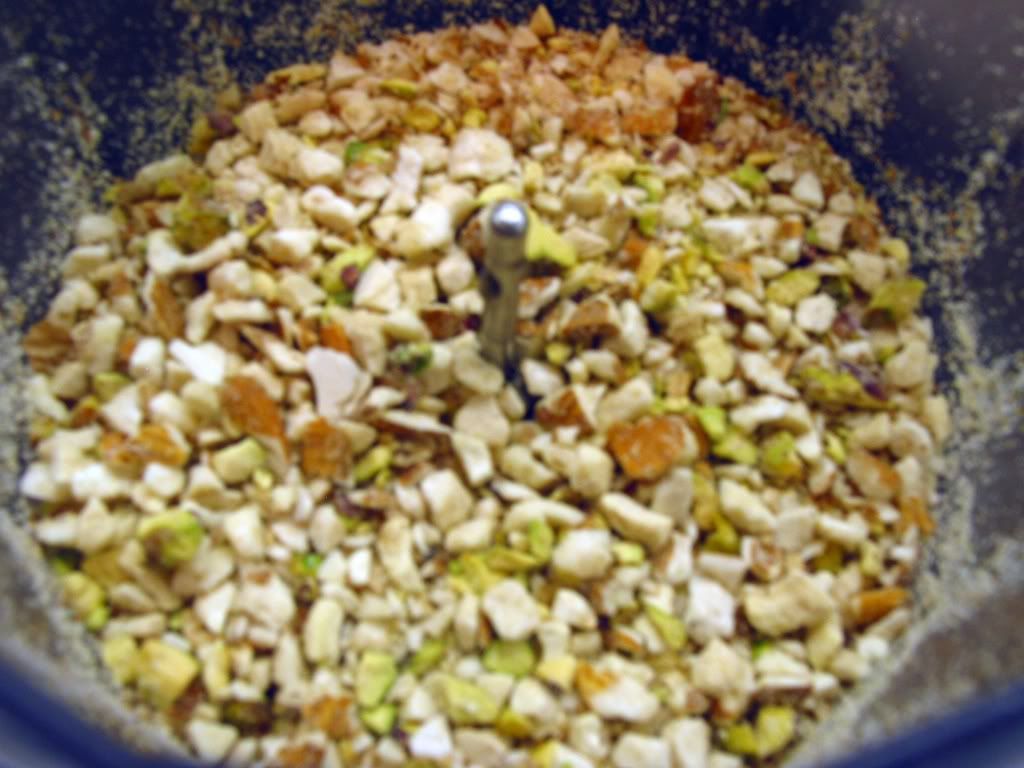
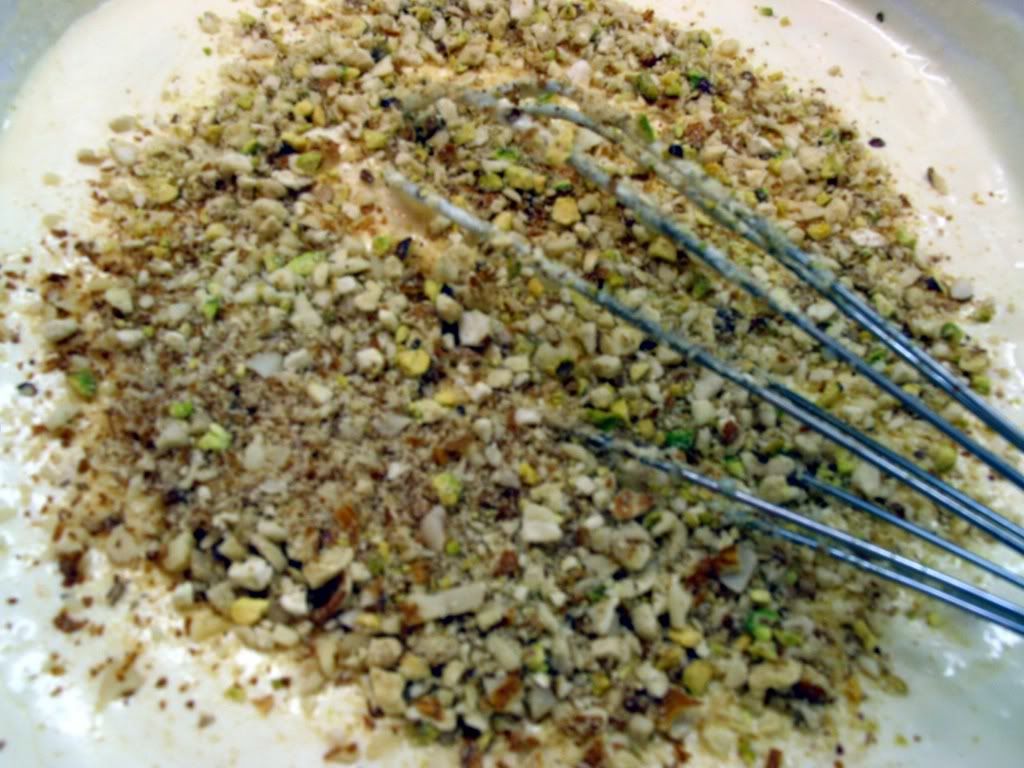
In a blender or chopper chop the nuts coarsely and keep aside
Drain the crushed pineapple and keep it aside
In a big bowl mix in whipped cream, condensed milk, pineapple and chopped nuts
Freeze it for 6-8 hours or overnight
Tada! pineapple dessert is ready to serve!!
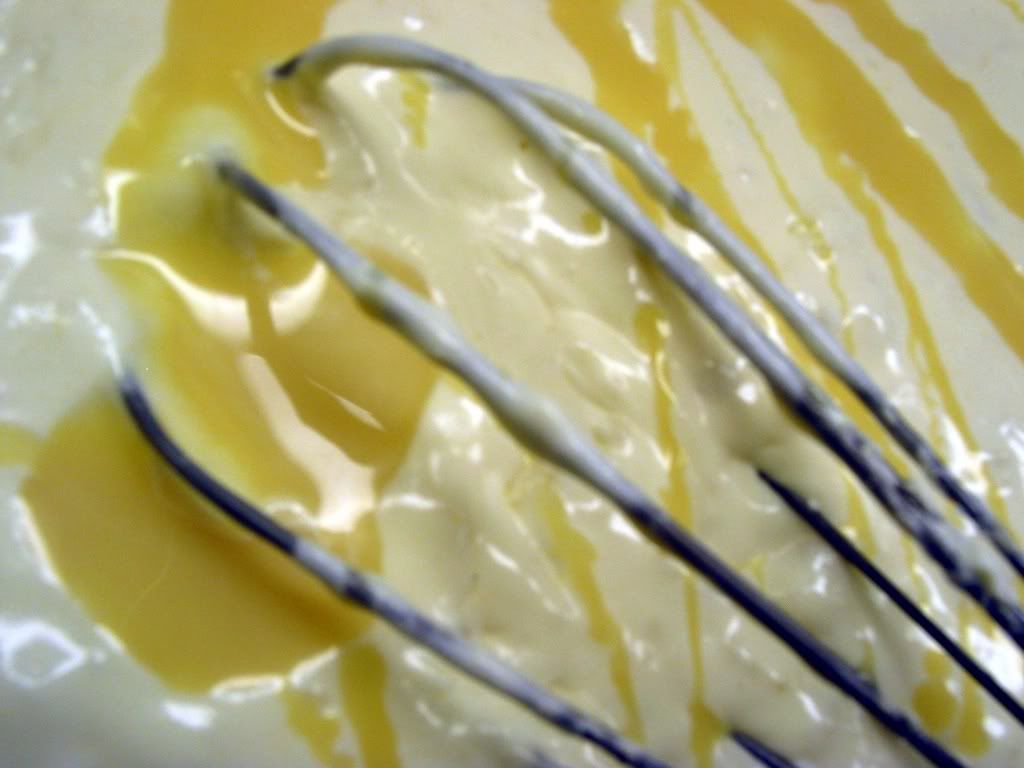
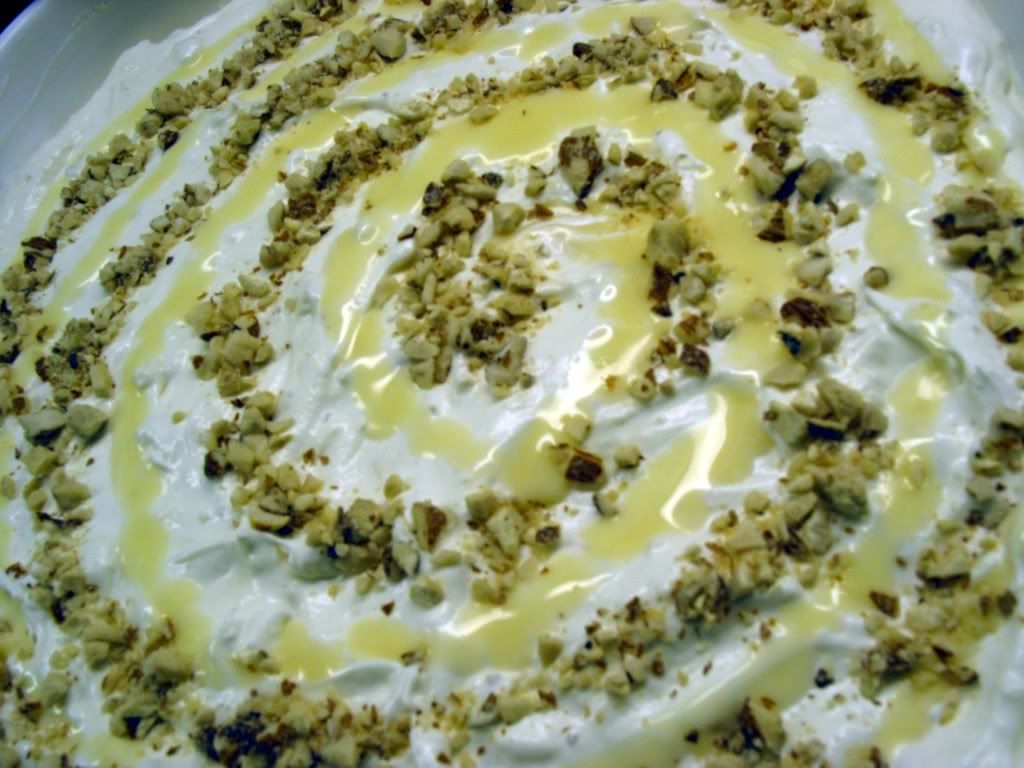 Pineapple dessert finished with spirals of condensed milk and chopped nuts
This pineapple dessert is neither too sweet nor too sour, Its just right.Be generous and Never forget the nuts which add crunch and so much flavor to the dessert. I am gonna make this again for the Diwali potluck this weekend. Hope the magic works again!!
This will be my post for JFS:Diwali hosted by Vee of Past,Present and Me. Also this will be going to WYF: DESSERT hosted by Hima of Snackorama.
Tags: Badam kaju and pista. nuts and cool whip, Deepavali, Diwali, Pineapple Dessert, Sweets


